Introduction
My aim here is to share how I solved some problems encountered when trying to set-up DNS-over-TLS (DoT) for an AdGuard Home instance I was hosting at home. In short, my android phone didn’t recognize my AdGuard Home instance as a valid DoT server due to problems with Let’s Encrypt certificate , thus I could not use it outside of my LAN. Despite renewing the certificate as suggested here, I was not able to make it work. I thus started researching and stumbled upon an intriguing comment on AdGuard Home GitHub repository. The comment suggested to use SSL certificates from ZeroSSL, instead of those from Let’s Encrypt. I had never heard about ZeroSSL before and I gladly discovered that they issue SSL certs for free. Using certs from ZeroSSL worked instantly.
The following mini-tutorial does not pretend to be exhaustive and may contain errors. Feel free to comment on this post or write me on Mastodon for suggestions or additions. Also, please note that this mini tutorial has been developed for Arch Linux and a domain using Hetnzer’s DNS. However, I guess it can be easily adapted to any other modern Linux distro and DNS provider.
Background
AdGuard Home (ADGH, in the following) is a nice alternative to Pi-hole (PH). Both ADGH and PH are are pretty solid recursive DNSs, mostly used as network-wide adblockers. Both of them work following the same principle: using some pre-made lists, they block outgoing DNS requests towards known ads/tracking/malware server, making your browsing more pleasant (well, less annoying at least…), along with faster and more private.
When installed and set up as as the DNS servers on your LAN, ADGH and PH remove all (well, most…) ads from you smartTV, smartphones and computers. Both being equally efficient and reliable, ADGH offers a bit more goodies out-of-the-box, as it makes really easy to add encrypted DNS-over-HTTPS (DoH) and DNS-over-TLS (DoT) services to the standard DNS resolver over port 53. DoT/DoH make it possible to use you own adblocking DNS, hosted on your LAN or on a VPS, also when you’re away from home, for instance on your smartphone, without the need to open port 53 of your LAN to outside world.
Prerequisites
The following is assumed here:
- You have a self-hosted ADGH instance on a Linux server and access to it as the admin.
- You are familiar with Linux command line.
- You are working on the same machine your server is installed on.
- You have a basic knowledge of what DNS is and how to create DNS records for a domain you own.
- You have a subdomain name pointed to the server’s IP you’re hosting ADGH on. The latter can be obtained for free on afraid.org.
- In case the aforementioned server does not have a dedicated IP, you have access to a DDNS service. You can get also this for free on afraid.org.
- If your server is behind NAT, open 853 should be open on your router.
- It is HIGHLY RECOMMENDED to block (or do not open) port 53 on your router. This is the standard DNS port and can (will) be abused by anyone, if left open.
Getting a certificate for your domain using acme.sh and renew it automatically
Let’s start by getting a certificate for your domain using acme.sh, which is a shell script will allows you to obtain and maintain certificates. In the following, dns.yourdomain.com will be the example subdomain we’re using to obtain the certificate for. Right now, acme.sh uses ZeroSSL by default to issue certificates.
>>> Remember to create your subdomain in the DNS zone and point it to the IP of the server hosting AdGuard Home, before proceeding further <<<
- Register a free account on ZeroSSL.com using an email such as
you@yourdomain.com. This email will be used to issue the certificate.
- Next, we need to install
acme.sh. Fire up your console and execute the following, in sequence.
$ git clone https://github.com/acmesh-official/acme.sh.git
$ cd ./acme.sh
$ ./acme.sh --install -m you@yourdomain.com
Note that you@yourdomain.com is the email address that will be associated to your domain’s certificate. In my understanding, you will receive there expiration/renewal notices about your certificate.
The commands mentioned above would
-
- Create and copy
acme.sh to your home dir, into : ~/.acme.sh/ (notice the dot: it’s a hidden folder). All certificates will be placed under this folder too.
- Enter
~/.acme.sh/
- Install
acme.sh on your system.
- Now we need to issue a certificate. Form now on, I will assume that the DNS zone for
yourdomain.com is managed through Hetzner DNS (free). Other DNS may work similarly. Refer to acme.sh wiki.
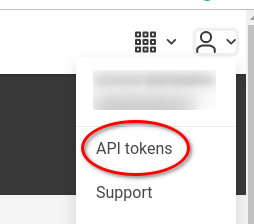
- We need an API token from Hetzner’s DNS console. Fo this, log in into your DNS console and select you domain there. Select the icon of the stylized silhouette (upper right) and choose “API tokens”, as in the Figure below:
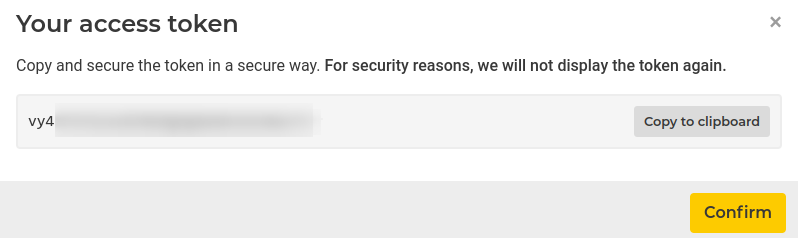
A new page will open, in which you can create a new token, giving it a suitable name. Let the name be “mytoken“, for instance. Once you type the name and press “Create access button”, the new token (a large string with random characters) will be shown, as follows (click to enlarge):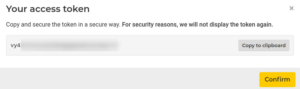
Copy it somewhere before clicking “Confirm”, as it won’t be shown again. For the sake of the argument, let’s assume that the token is mynicetoken123456 in the following.
- We need to export the newly created token to allow
acme.sh to use it. For this, execute
$ export HETZNER_Token="mynicetoken123456"
- The token will we exported in the
HETZNER_Token variable and saved in ~/.acme.sh/account.conf to be reused when needed (when renewing the certificate or issuing new certificates for different domains).
- Now we can issue our certificate. It will be saved under
~/.acme.sh/dns.yourdomain.com/. To actually issue the certificate, execute
$ acme.sh --issue --dns dns_hetzner -d dns.yourdomain.com
If everything is set up correctly, your certificate will be issued, something that can literally take 2 to 3 minutes. At the end of the process, something like this will be shown on you console:
Your cert is in: /home/you/.acme.sh/dns.yourdomain.com/dns.yourdomain.com.cer
Your cert key is in: /home/you/.acme.sh/dns.yourdomain.com/dns.yourdomain.com.key
The intermediate CA cert is in: /home/you/.acme.sh/dns.yourdomain.com/ca.cer
And the full chain certs is there: /home/you/.acme.sh/dns.yourdomain.com/fullchain.cer
Now, free certificates issued from ZeroSSL (as well as those issued from Let’s Encrypt) have a limited lifetime (90 days), so they have to be renewed periodically. This can be done “by hand” or we can write a systemd timer/service to keep our certificate up to date automatically. When called, the systemd service will renew the certificate, while the systemd timer will run te systemd service periodically to check if renewal is needed.
Let’s start by creating the systemd service file. With your favorite text edito (nano, vim, …) create a text file under /etc/systemd/system/ calling it, for instance, zerossl-renew.service(you will need to use sudo for this):
sudo nano /etc/systemd/system/zerossl-renew.service
The content of the file should be something as (remember to modify the /home/you paths so they point to your home directory):
[Unit]
Description=Renew zerossl  certificates using acme.sh
After=network-online.target

[Service]
Type=oneshot
# --home's argument should be where the acme.sh script resides.
ExecStart=/home/you/.acme.sh/acme.sh --renew-all --home /home/you/.acme.sh/

SuccessExitStatus=0 2
This systemd unit will renew all certificates that acme.sh has issued for you (note the --renew-alloption), in particular that of dns.yourdomain.com. I prefer it this way, as it completely automates certificates management (“set and forget”).
Once saved the unit, you cant test it by launching:
$ sudo systemctl start zerossl-renew.service
and checking it’s status with
sudo systemctl status zerossl-renew.service
If everything is correct and you have just issued your certificate, a message telling that your certificate is still valid (thus, for the moment renewal will be skipped) should be printed on your screen:
Skip, Next renewal time is: 2023-03-02T15:22:57Z
Add '--force' to force to renew.
Skipped dns.yourdomain.com
If any error is printed, go back to the unit script and check for syntax errors or wrong paths.
If everything works, we can finally create the systemd timer which automatizes the renewal of our certificate. Again fire up your favorite text edito and create a new text file under /etc/systemd/system/ calling it zerossl-renew.timer, this time. The content of the file should look as follows:
[Unit]
Description=Daily renewal of ZeroSSL certificates

[Timer]
OnCalendar=daily
RandomizedDelaySec=1h
Persistent=true

[Install]
WantedBy=timers.target
Once saved, just start and enable the timer (enabling will make the service start automatically at each reboot):
$ sudo systemctl start zerossl-renew.timer
$ sudo systemctl enable zerossl-renew.timer
$ sudo systemctl status zerossl-renew.timer
Again, the latest command allows us to check for errors in the timer and to correct them.
Summarizing, the timer will daily launch the unit which, in turn, will renew the certificate if it is close to expiration. Now, we can configure AdGuard Home.
AdGuard Home Configuration
First of all, you need to configure ADGH to use DoT. To do this, go to Settings -> Encryption settings and check “Enable Encryption” as follows:
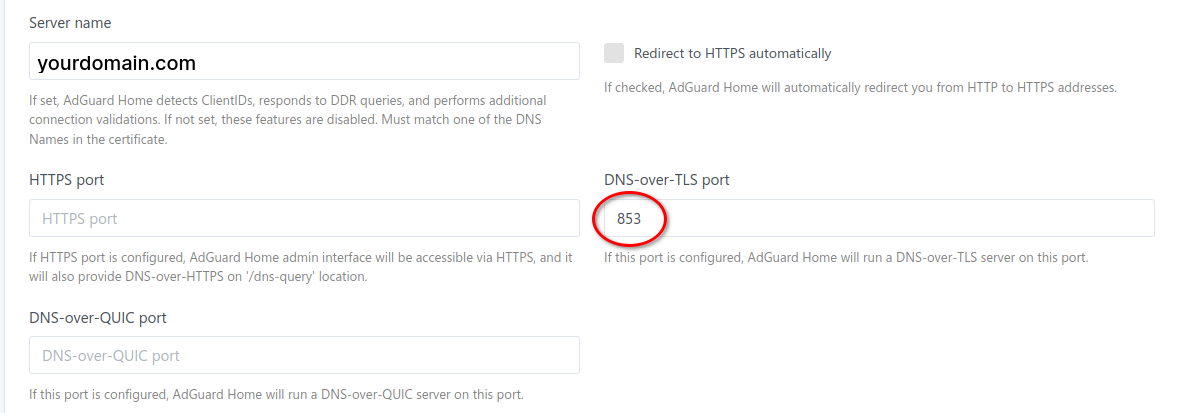
Once you have done that, in the following field fill in your domain name (dns.yourdomain.com in our example) and port 853 for DoT, as follows (click to enlarge):
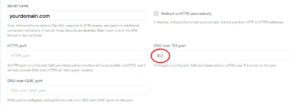
If “HTTPS port” and “DNS-ovew-QUIC port” port are left without a port number, these feature won’t be used. For Android, only DNS-over TLS port is important.
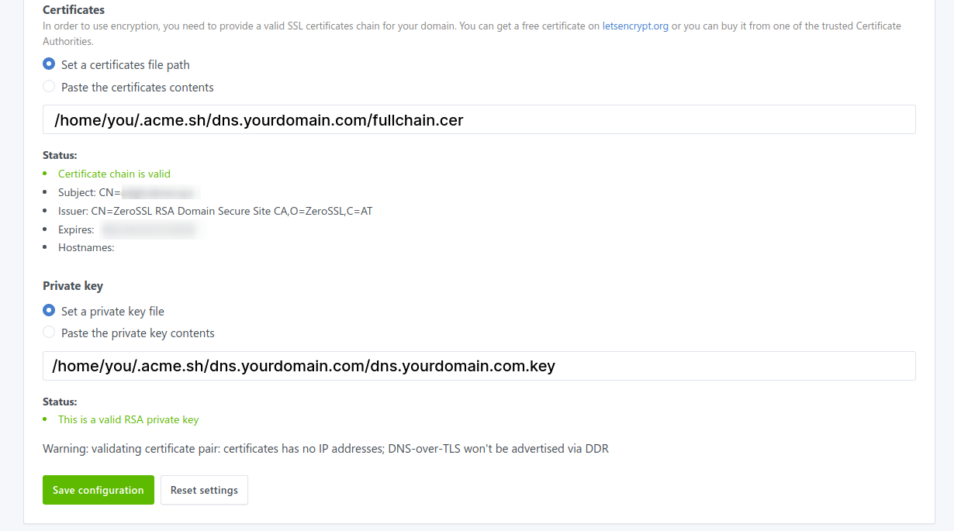
Now, looking further down on the same page, you will find the “Certificates” and “Private key” fields. Fill them using the paths of your certificates and keys as shown above, as in the figure (click to enlarge):

At this point, click on “Save configuration” and disregard the warning about missing IP. Try your new DoT server in your Android phone by simply activating “Private DNS” under “Network & Internet”, using dns.yourdomain.com as the server. Finger crossed, everything will work at the first attempt.
You can further configure ADGH, adding more filters list (just explore its interface). I suggest to add a filter list to block requests to alternative DoT or DoH servers. This will be useful to avoid apps/devices with hardcoded DNS to bypass your ADGH instance. For this, I personally use:
https://raw.githubusercontent.com/crypt0rr/public-doh-servers/main/dns.list
Hope this tutorial is useful for you. Enjoy ads-free internet on your Android phone 😉